APPENDIX F
ORIENTEERING
What is orienteering? Orienteering is a competitive form of land navigation. It is for all ages and degrees of fitness and skill. It provides the suspense and excitement of a treasure hunt. The object of orienteering is to locate control points by using a map and compass to navigate through the woods. The courses may be as long as 10 km.
F-1. HISTORY
Orienteering began in Scandinavia in the nineteenth century. It was primarily a military event and was part of military training. It was not until 1919 that the modern version of orienteering was born in Sweden as a competitive sport. Ernst Killander, its creator, can be rightfully called the father of orienteering. In the early thirties, the sport received a technical boost with the invention of a new compass, more precise and faster to use. The Kjellstrom brothers, Bjorn and Alvan, and their friend, Brunnar Tillander, were responsible for this new compass. They were among the best Swedish orienteers of the thirties, with several individual championships among them. Orienteering was brought into the US in 1946 by Bjorn Kjellstrom.
F-2. DESCRIPTION
Each orienteer is given a 1:50,000 topographic map with the various control points circled. Each point has a flag marker and a distinctive punch that is used to mark the scorecard. Competitive orienteering involves running from checkpoint to checkpoint. It is more demanding than road running, not only because of the terrain, but because the orienteer must constantly concentrate, make decisions, and keep track of the distance covered. Orienteering challenges both the mind and the body; however, the competitor’s ability to think under pressure and make wise decisions is more important than speed or endurance.
F-3. THE COURSE
The orienteering area should be on terrain that is heavily wooded, preferably uninhabited, and difficult enough to suit different levels of competition. The area must be accessible to competitors and its use must be coordinated with appropriate terrain and range control offices.
a. The ideal map for an orienteering course is a multi-colored, accurate, large-scale topographic map. A topographic map is a graphic representation of selected man made and natural features of a part of the earth’s surface plotted to a definite scale. The distinguishing characteristic of a topographic map is the portrayal of the shape and elevation of the terrain by contour lines.
b. For orienteering within the United States, large-scale topographic (topo) maps are available from the Defense Mapping Agency Hydrographic Topographic Center. The scale suitable for orienteering is 1:50,000 (DMA).
F-4. SETTING UP THE COURSE
The challenge for the course setter is to keep the course interesting, but never beyond the individual’s or group’s ability. General guidance is to select locations that are easily identifiable on the map and terrain, and accessible from several routes.
a. Those who set up the initial event should study a map for likely locations of control points and verification of the locations. Better yet, they should coordinate with an experienced competitor in selecting the course.
b. There are several forms of orienteering events. Some of the most common are route, line, cross-country, and score orienteering.
(1) Route Orienteering. This form can be used during the training phase and in advanced orienteering. In this type of event, a master or advanced competitor leads the group as they walk a route. The beginners trace the actual route walked on the ground on their maps. They circle the location of the different control points found along the walked route. When they finish, the maps are analyzed and compared. During training, time is not a factor. Another variation is when a course is laid out on the ground with markers for the competitor to follow. There is no master map, as the course is traced for the competitor by flags or markers. The winner of the event is the competitor who has successfully traced the route and accurately plotted the most control points on his map.
(2) Line Orienteering. At least five control points are used during this form of orienteering training. The competitor traces on his map a preselected route from a master map. The object is to walk the route shown on the map, circling the control points on the map as they are located on the ground (Figure F-1).
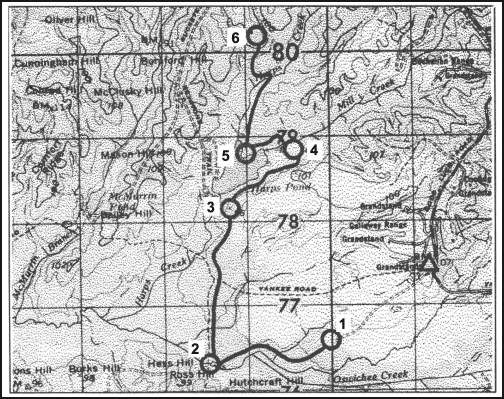
Figure F-1. Line orienteering.
(3) Cross-Country Orienteering. This is the most common type of orienteering competitions. It is sometimes called free or point orienteering and is considered to be the most competitive and intriguing of all events (Figure F-2). In this event, all competitors must visit the same controls in the same order. With the normal one-minute starting interval, it becomes a contest of route choice and physical skill. The winner is the contestant with the fastest time around the course.
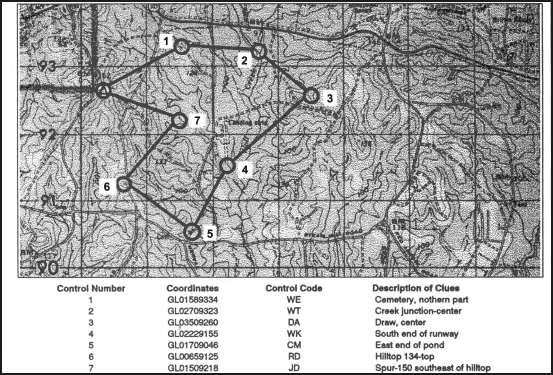
Figure F-2. A cross-country orienteering map.
(a) After selecting the control points for the course, determine the start and finish locations. The last control should be near the finish. In describing each control’s location, an eight-digit grid coordinate and a combination of two letters identifying the point (control code) should be included in each descriptive clue list that is normally given to each competitor at least two minutes before his start time.
(b) There are usually 6 to 12 control markers on the course in varying degrees of difficulty and distances apart so that there are no easy, direct routes. Instead, each competitor is faced with many choices of direct but difficult routes, or of indirect but easier routes. Each control’s location is circled, and the order in which each is to be visited is clearly marked on the master map. The course may be a closed transverse with start and finish collocated, or the start and finish may be at different locations. The length of the course and difficulty of control placement varies with the competitors’ degree of expertise. Regardless of the class of event, all competitors must indicate on their event cards proof of visiting the control markers. Inked stamps, coded letters, or punches are usually used to do this procedure.
NOTE:
(4) Score orienteering. In this event, the area chosen for the competition is blanketed with many control points (Figure F-3). The controls near the start/finish point (usually identical in this event) have a low point value, while those more distant or more difficult to locate have a high point value. (See Figure F-6 for a sample card.) This event requires the competitor to locate as many control markers as he can within the specified time (usually 90 minutes). Points are awarded for each control visited and deducted for exceeding the specified time. The competitor with the highest point score is the winner.
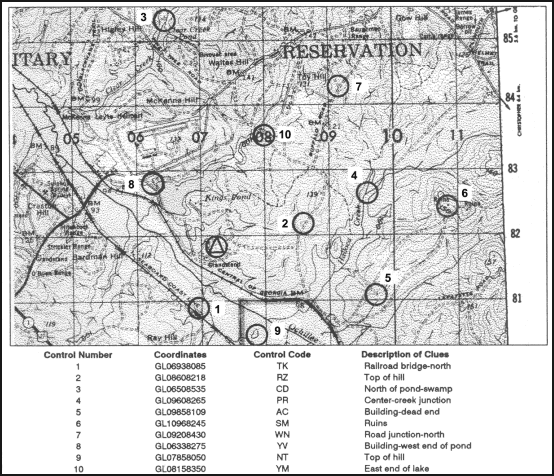
Figure F-3. A score orienteering map.
(a) Conducting a score event at the start is basically the same as the cross-country event. The competitor is given a map and an event card. The event card lists all the controls with their different point values. When released to the master map, the competitor finds the circles and numbers indicating the location of all the controls listed on his event card. He copies all the red circles on his map. Then he chooses any route he wishes to take in amassing the highest possible point score in the time available. The course is designed to ensure that there are more control points than can possibly be visited in the allotted time. Again, each control marker visited must be indicated on the event card.
(b) It is important for the competitor to take time initially to plot the most productive route. A good competitor may spend up to 6 minutes in the master map area while plotting the ideal route.
(c) There is no reward for returning early with time still available to find more points, so the good competitor must be able to coordinate time and distance with his ability in land navigation in running the course.
F-5. OFFICIALS
The same officials can be used at the start and finish. More officials or assistants can be used; the following material lists the minimum that can be used for a competition. They include the following:
a. At The Start.
(1) Course Organizer—Briefs the orienteers in the assembly area, issues event cards and maps, and calls orienteers forward to start individually.
(2) Recorder—Records orienteer’s name and start time on recorder’s sheet, checks orienteer’s name and start number on his event card, and issues any last-minute instructions.
(3) Timer—Controls the master clock and releases the orienteers across the start line at their start time (usually at one-minute intervals) to the master map area.
b. At The Finish.
(1) Timer—Records finish time of each orienteer on the orienteer’s event card and passes card to recorder.
(2) Recorder—Records finish time of each orienteer on the orienteer’s event card and passes card to recorder.
(3) Course Organizer—Verifies correctness of names, finish times, and final score; posts orienteers’ positions on results board; and accounts for all orienteers at the end of event.
F-6. START/FINISH AREA
The layout of the start/finish areas for orienteering events is basically the same for all forms.
a. Assembly Area. This is where orienteers register and receive instructions, maps, event cards, and start numbers. They may also change into their orienteering clothes if facilities are available, study their maps, and fill out their event cards here. Sanitation facilities should be available in this area.
b. Start. At the start, the orienteer reports to the recorder and timer’s table to be logged in by the recorder and released by the timer.
c. Master Map Area. There are three to five master maps 20 to 50 meters from the start. When the orienteer arrives at this area, he must mark his map with all the course’s control points. Having done this, he must decide on the route that he is to follow. The good orienteer takes the time to orient his map and carefully plot his route before rushing off. It is a good idea to locate the master map area out of sight of the start point to preclude orienteers tracking one another.
d. Equipment. The following is a list of equipment needed by the host of an orienteering event:
-
Master maps, three to five, mounted.
-
Competitor maps, one each.
-
Event cards, one each.
-
Recorder’s sheets, two.
-
Descriptive clue cards, one each.
-
Time clocks, two.
-
Rope, 100 to 150 feet, with pegs for finish tunnel.
-
Card tables, one or two.
-
Folding chairs, two or three.
-
Results board.
-
Control markers, one per point.
-
Extra compasses.
-
Whistle, for starting.
-
First aid kit.
-
Colored tape or ribbon for marking route to master map and from last control point to finish.
e. Control Markers. These are orange-and-white markers designating each control point (Figure F-4). Ideally, they should have three vertical square faces, forming a triangle with the top and bottom edges. Each face should be 12 inches on a side and divided diagonally into red and white halves or cylinders (of similar size) with a large, white, diagonal stripe dividing the red cylinder. For economy or expediency, 1-gallon milk cartons, 5-gallon ice cream tubs, 1-gallon plastic bleach bottles, or foot-square plaques, painted in the diagonal or divided red and white colors of orienteering, may be used.
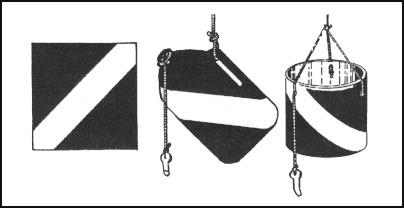
Figure F-4. Control markers.
(1) Each marker should have a marking or identification device for the orienteer to use to indicate his visit to the control. This marker may be the European-style punch pliers, a self-inking marker, different colored crayons at each point, different letter combinations, different number combinations, or different stamps or coupons. The marking device must be unique, simple, and readily transcribable to the orienteers’ event cards.
(2) The control marker should normally be visible from at least 10 meters. It should not be hidden.
f. Recorder’s Sheets. A suggested format for the recorder’s sheet is depicted in Figure F-5.
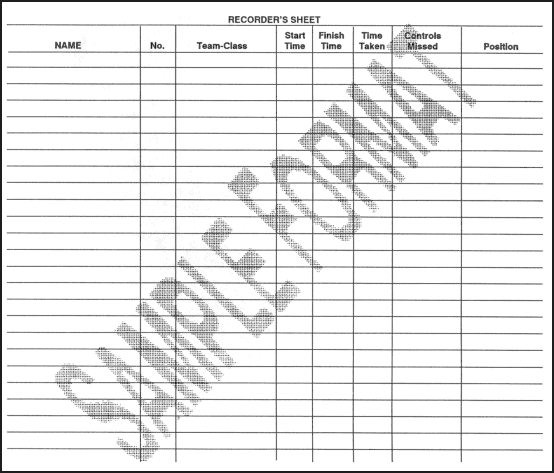
Figure F-5. Recorder’s sheet.
g. Event Card. The event card can be made before the event and should be as small as possible, as it is carried by the competitor. It must contain the following items: name, start number, start time, finish time, total time, place, and enough blocks for marking the control points. As indicated earlier, it may also contain a listing of descriptive clues (Figure F-6).
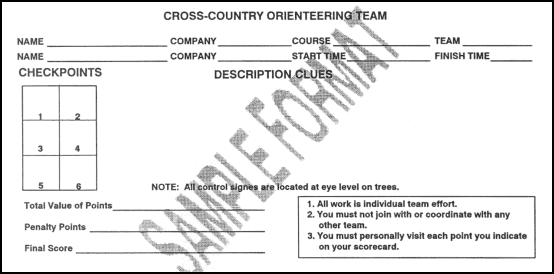
Figure F-6. Cross-country orienteering event card.
h. Results Board. This board displays the orienteer’s position in the event at the finish (Figure F-7). There are a variety of ways of displaying the results, from blackboard to ladder-like to a clothesline-type device where each orienteer’s name, point score, and times are listed.
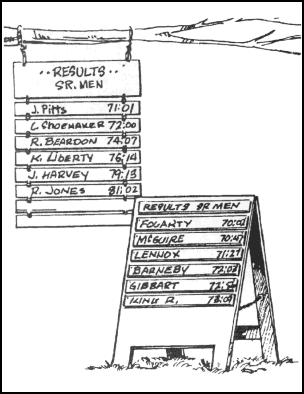
Figure F-7. Results board.
i. Clue Description Card. These cards are prepared with the master maps after the course is set. They contain the descriptive clues for each control point, control code, grid coordinate references, returning time for competitors, removal times for each location, and panic azimuth (Figure F-8). The terminology on these must be identical to that listed in the definition section. These cards and the master maps must be kept confidential until the orienteers start the event.
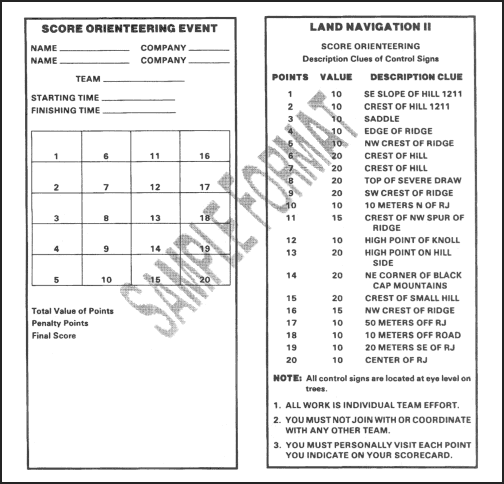
Figure F-8. Clue description card.
j. Scoring. The cross-country or free event is scored by the orienteer’s time alone. All control points must be visited; failure to visit one results in disqualification. In this event, the fastest time wins.
(1) A variation that can be introduced for novices is to have a not-later-than return time at the finish and add minutes to the orienteer’s final time for minutes late and control points not located.
(2) The score event requires the amassing of as many points as possible within the time limit. Points are deducted for extra time spent on the course, usually one point for each 10 seconds extra.
k. Prizes. A monetary prize is not awarded. A suggested prize for beginners is an orienteering compass or some other practical outdoor-sports item.
F-7. SAFETY ON THE COURSE
A first aid kit must be available at the start and finish. One of the officials should be trained in first aid or have a medic at the event. Other safety measures include:
a. Control Points. Locate the controls where the safety of the competitor is not jeopardized by hazardous terrain or other circumstances.
b. Safety Lane. Have a location, usually linear, on the course where the competitor may go if injured, fatigued, or lost. A good course will usually have its boundary as a safety lane. Then a competitor can set a panic azimuth on the compass and follow it until he reaches the boundary.
c. Finish Time. All orienteering events must have a final return time. At this time, all competitors must report to the finish line even if they have not completed the course.
d. Search-and-Rescue Procedures. If all competitors have not returned by the end of the competition, the officials should drive along the boundaries of the course to pick up the missing orienteers.
F-8. CONTROL POINT GUIDELINES
When the control point is marked on the map as well as on the ground, the description of that point is prefaced by the definite article the; for example, the pond. When the control point is marked on the ground but is not shown on the map, then the description of the point is prefaced by the indefinite article a; for example, a trail junction. In this case, care must be taken to ensure that no similar control exists within at least 25 meters. If it does, then either the control must not be used or it must be specified by a directional note in parentheses; for example, a depression (northern). Other guidelines include:
a. Points of the compass are denoted by capital letters; for example, S, E, SE.
b. Control points within 100 meters of each other or different courses are not to be on the same features or on features of the same description or similar character.
c. For large (up to 75 meters across) features or features that are not possible to see across, the position of the control marker on the control point should be given in the instructions. For example, the east side of the pond; the north side of the building.
d. If a very large (100 to 200 meters) feature is used, the control marker should be visible from most directions from at least 25 meters.
e. If a control point is near but not on a conspicuous feature, this fact and the location of the marker should be clearly given; for example, 10 meters E of the junction. Avoid this kind of control point.
f. Use trees in control descriptions only if they are prominent and a totally different species from those surrounding. Never use bushes and fauna as control points.
g. Number control points in red on the master map.
h. For cross-country events, join all control points by a red line indicating the course’s shape.
F-9. MAP SYMBOLS
The map symbols in Figure F-9 are typical topographic and cultural symbols that can be selected for orienteering control points. The map cutouts have been selected from DMA maps.
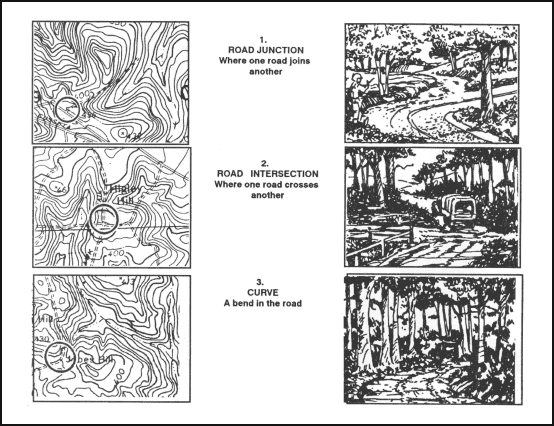
Figure F-9. Map symbols.
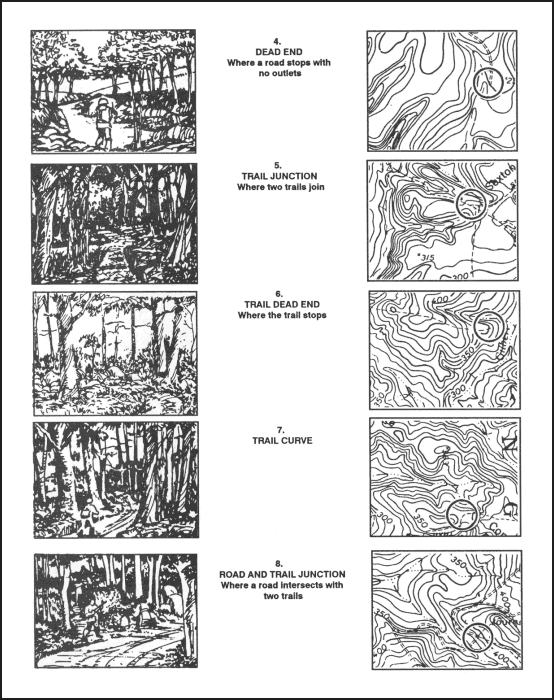
Figure F-9. Map symbols (continued).
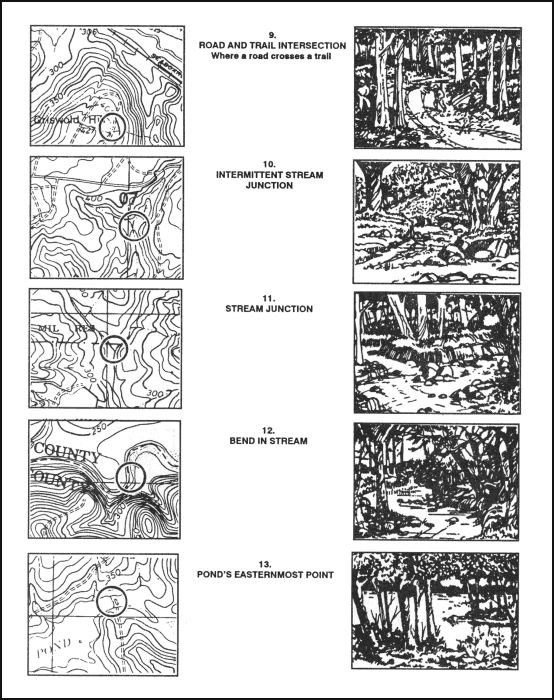
Figure F-9. Map symbols (continued).
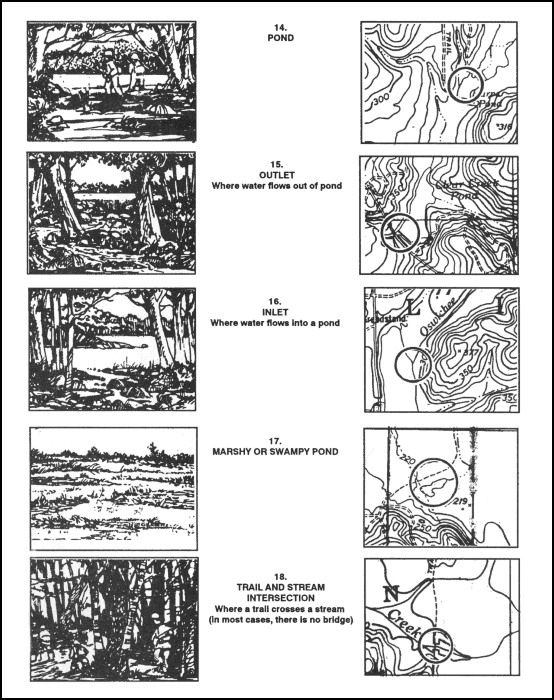
Figure F-9. Map symbols (continued).
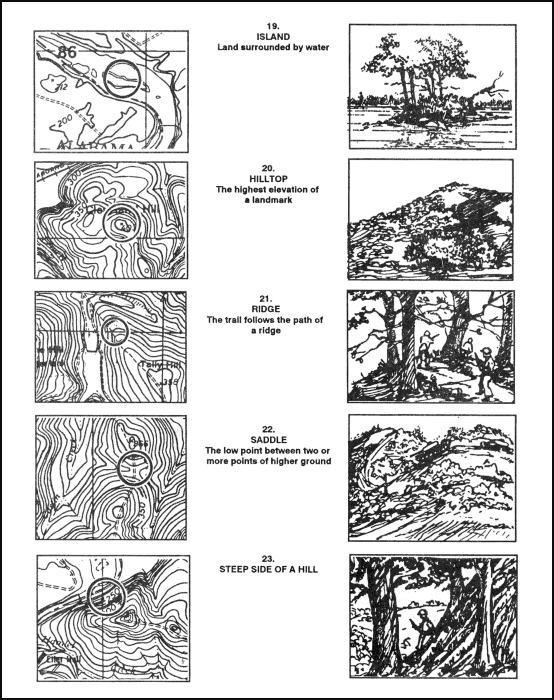
Figure F-9. Map symbols (continued).
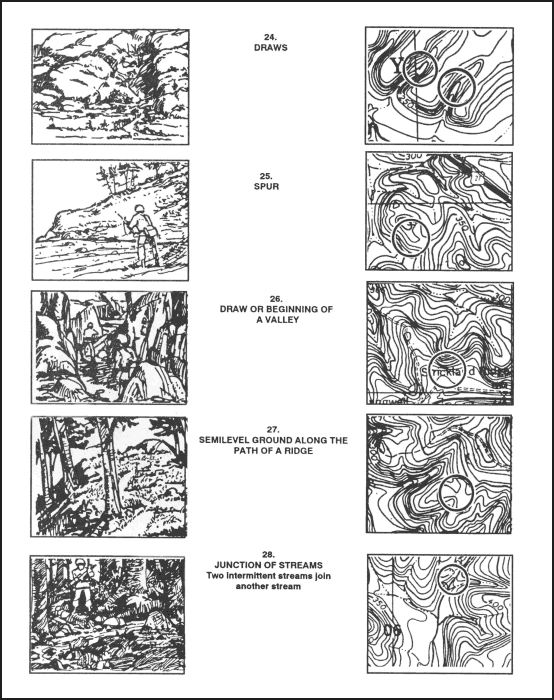
Figure F-9. Map symbols (continued).
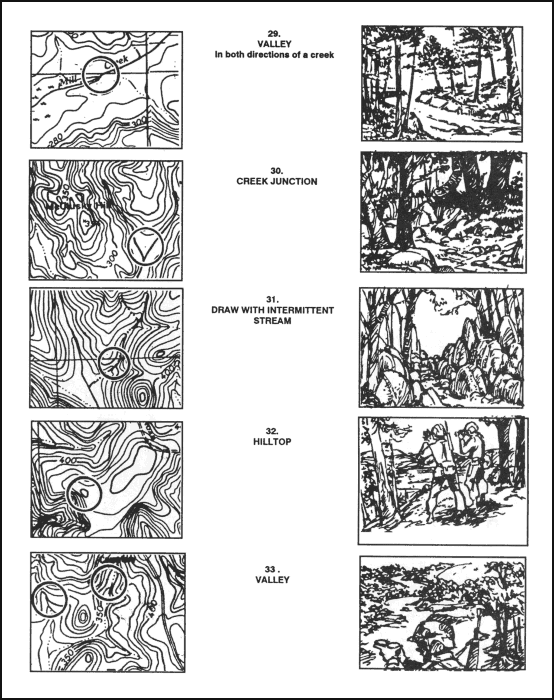
Figure F-9. Map symbols (continued).
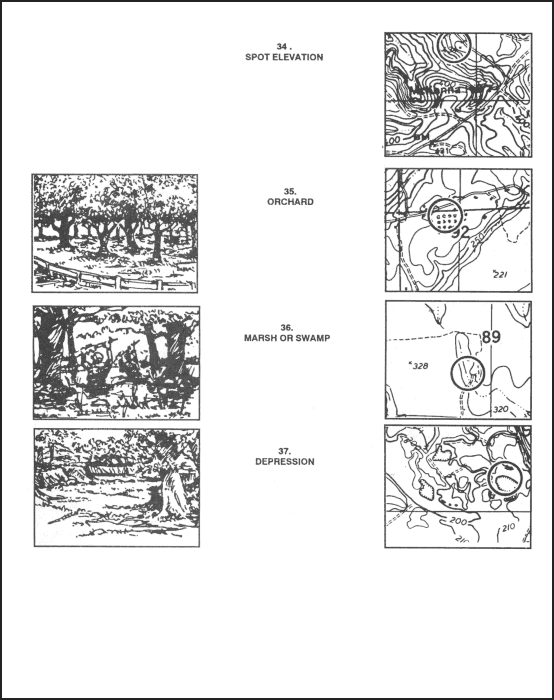
Figure F-9. Map symbols (continued).
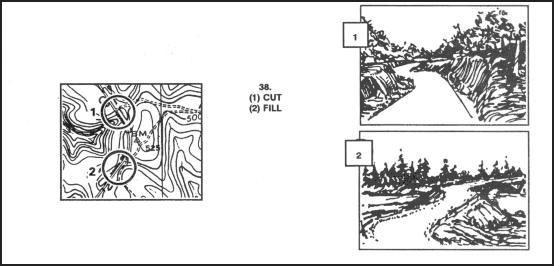
Figure F-9. Map symbols (continued).
F-10. ORIENTEERING TECHNIQUES
The orienteer should try not to use the compass to orient the map. The terrain association technique is recommended instead. The orienteer should learn the following techniques:
a. Pacing. One of the basic skills that the orienteer should develop early is how to keep track of distance traveled while walking and running. This is done on a 100-meter pace course.
b. Thumbing. This technique is very simple, but the map has to be folded small to use it. The orienteer finds his location on the map and places his thumb directly next to it. He moves from point to point on the ground without moving his thumb from his initial location. To find the new location, the only thing that he has to do is look at the map and use his thumb as a point of reference for his last location. This technique prevents the orienteer from looking all over the map for his location.
c. Handrails. This technique enables the orienteer to move rapidly on the ground by using existing linear features (such as trails, fences, roads, and streams) that are plotted along his route. They can also be used as limits or boundaries between control points (Figure F-10).
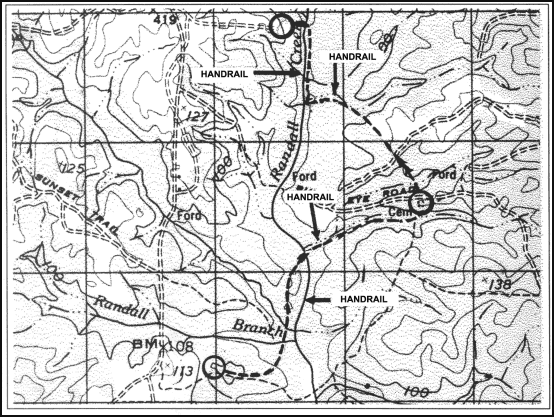
Figure F-10. Handrails.
d. Attack Points. These are permanent known landmarks that are easily identified on the ground. They can be used as points of reference to find control points located in the woods. Some examples of attack points are stream junctions, bridges, and road intersections.
F-11. CIVILIAN ORIENTEERING
Civilian orienteering is conducted under the guidelines of the United States Orienteering Federation with at least 70 clubs currently affiliated. Although civilian orienteering is a form of land navigation, the terms, symbols, and techniques are different from the military.
a. An expert military map reader/land navigator is by no means ready to compete in a civilian orienteering event. However, military experience in navigating on the ground and reading maps will help individuals to become good orienteers. Several orienteering practices and complete familiarization with the map symbols and terms before participating in a real orienteering event is recommended.
(1) Map. The standard orienteering map is a very detailed, 1:15,000-scale, colored topographical map. All orienteering maps contain only north-south lines that are magnetically drawn; this eliminates any declination conversions. Because of the absence of horizontal lines, grid coordinates cannot be plotted and therefore are not needed.
(2) Symbols (Legend). Despite standard orienteering symbols, the legend in orienteering maps has a tendency to change from map to map. A simple way to overcome this problem is to get familiar with the legend every time that a different map is used.
(3) Scale. The scale of orienteering maps is 1:15,000. This requires an immediate adjustment for the military land navigator, especially while moving from point to point. It takes a while for a person that commonly uses a 1:50,000 scale to get used to the orienteering map.
(4) Contours. The normal contour interval in an orienteering map is 5 meters. This interval, combined with the scale, makes the orienteering maps so meticulously detailed that a 1-meter boulder, a 3-meter shallow ditch, or a 1-meter depression will show on the map. This may initially shock a new orienteer.
(5) Terms and Description of Clues. The names of landforms are different from those commonly known to the military. For example, a valley or a draw is known as a reentrant; an intermittent stream is known as a dry ditch. These terms, with a description of clues indicating the position and location of the control points, are used instead of grid coordinates.
b. The characteristics of the map, the absence of grid coordinates, the description of clues, and the methods used in finding the control points are what make civilian orienteering different from military land navigation.
Land Navigation Training Software
- Chapter 1: TRAINING STRATEGY
- Chapter 2: MAPS
- Chapter 3: MARGINAL INFORMATION AND SYMBOLS
- Chapter 4: GRIDS
- Chapter 5: SCALE AND DISTANCE
- Chapter 6: DIRECTION
- Chapter 7: OVERLAYS
- Chapter 8: AERIAL PHOTOGRAPHS
- Chapter 9: NAVIGATION EQUIPMENT AND METHODS
- Chapter 10: ELEVATION AND RELIEF
- Chapter 11: TERRAIN ASSOCIATION
- Chapter 12: MOUNTED LAND NAVIGATION
- Chapter 13: NAVIGATION IN DIFFERENT TYPES OF TERRAIN
- Chapter 14: UNIT SUSTAINMENT
- Appendix A: FIELD SKETCHING
- Appendix B: MAP FOLDING TECHNIQUES
- Appendix C: UNITS OF MEASURE AND CONVERSION FACTORS
- Appendix D: JOINT OPERATIONS GRAPHICS
- Appendix E: EXPORTABLE TRAINING MATERIAL
- Appendix F: ORIENTEERING
- Appendix G: M2 COMPASS
- Appendix H: ADDITIONAL AIDS
- Appendix I: FOREIGN MAPS
- Appendix J: GLOBAL POSITIONING SYSTEM
- Appendix K: PRECISION LIGHTWEIGHT GLOBAL POSITIONING SYSTEM RECEIVER
- Map Reading and Land Navigation GLOSSARY
- Map Reading and Land Navigation REFERENCES