Chapter 11
TERRAIN ASSOCIATION
Failure to make use of the vast amounts of information presented by the map and available to the eye on the ground reduces the chances for success in land navigation. The soldier who has repeatedly practiced the skills of identifying and discriminating among the many types of terrain and other features knows how these features are mapped. He can begin to visualize the shape of the land by studying the map, estimate distances, and perform quick resection from the many landmarks he sees is the one who will be at the right place to help defeat the enemy on the battlefield. This chapter tells how to orient a map with and without a compass, how to find locations on a map as well as on the ground, how to study the terrain, and how to move on the ground using terrain association and dead reckoning.
11-1. ORIENTING THE MAP
The first step for a navigator in the field is orienting the map. A map is oriented when it is in a horizontal position with its north and south corresponding to the north and south on the ground. Some orienting techniques follow:
a. Using a Compass. When orienting a map with a compass, remember that the compass measures magnetic azimuths. Since the magnetic arrow points to magnetic north, pay special attention to the declination diagram. There are two techniques used.
(1) First Technique. Determine the direction of the declination and its value from the declination diagram.
(a) With the map in a horizontal position, take the straightedge on the left side of the compass and place it alongside the north-south grid line with the cover of the compass pointing toward the top of the map. This procedure places the fixed black index line of the compass parallel to north-south grid lines of the map.
(b) Keeping the compass aligned as directed above, rotate the map and compass together until the magnetic arrow is below the fixed black index line on the compass. At this time, the map is close to being oriented.
(c) Rotate the map and compass in the direction of the declination diagram.
(d) If the magnetic north arrow on the map is to the left of the grid north, check the compass reading to see if it equals the G-M angle given in the declination diagram. The map is then oriented (Figure 11-1).
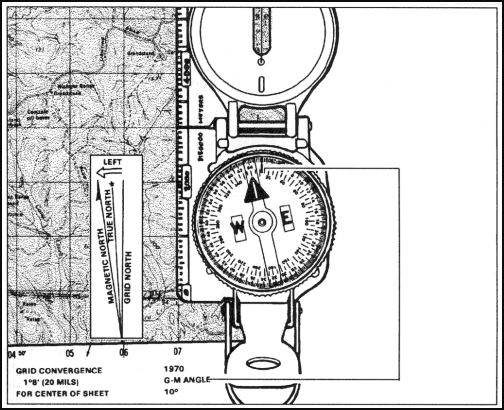
Figure 11-1. Map oriented with 11 degrees west declination.
(e) If the magnetic north is to the right of grid north, check the compass reading to see if it equals 360 degrees minus the G-M angle (Figure 11-2).
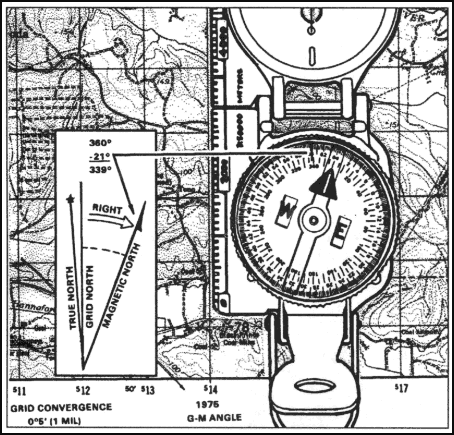
Figure 11-2. Map oriented with 21 degrees east declination.
(2) Second Technique. Determine the direction of the declination and its value from the declination diagram.
(a) Using any north-south grid line on the map as a base, draw a magnetic azimuth equal to the G-M angle given in the declination diagram with the protractor.
(b) If the declination is easterly (right), the drawn line is equal to the value of the G-M angle. Then align the straightedge, which is on the left side of the compass, alongside the drawn line on the map. Rotate the map and compass until the magnetic arrow of the compass is below the fixed black index line. The map is now oriented (Figure 11-3).
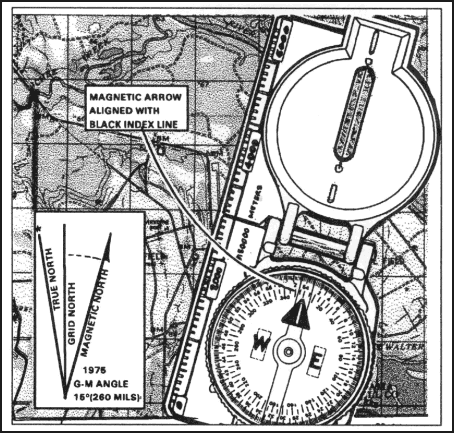
Figure 11-3. Map oriented with 15 degrees east declination.
(c) If the declination is westerly (left), the drawn line will equal 360 degrees minus the value of the G-M angle. Then align the straightedge, which is on the left side of the compass, alongside the drawn line on the map. Rotate the map and compass until the magnetic arrow of the compass is below the fixed black index line. The map is now oriented (Figure 11-4).
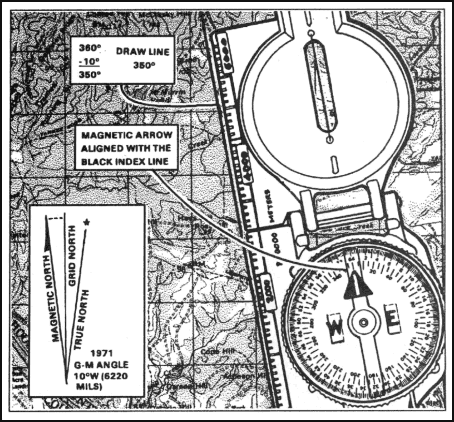
Figure 11-4. Map oriented with 10 degrees west declination.
NOTE:
1. Once the map is oriented, magnetic azimuths are determined using the compass. Do not move the map from its oriented position since any change in its position moves it out of line with the magnetic north. [See paragraph 11-6b(1).]
2. Special care should be taken whenever orienting your map with a compass. A small mistake can cause you to navigate in the wrong direction.
b. Using Terrain Association. A map can be oriented by terrain association when a compass is not available or when the user has to make many quick references as he moves across country. Using this method requires careful examination of the map and the ground, and the user must know his approximate location (Figure 11-5). Orienting by this method is discussed in detail in paragraph 11-3.
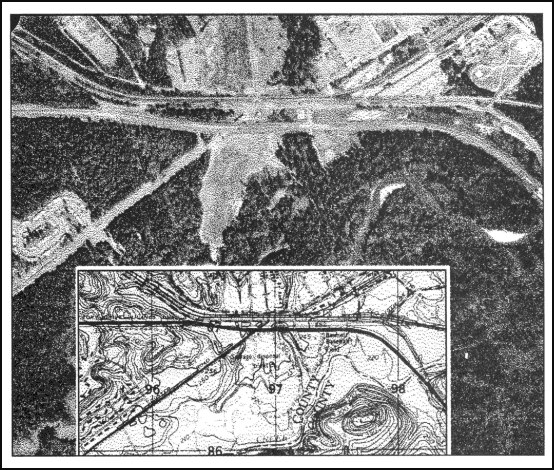
Figure 11-5. Terrain association.
c. Using Field-Expedient Methods. When a compass is not available and there are no recognizable terrain features, a map may be oriented by any of the field-expedient methods described in paragraph 9-5. Also see Figure 11-6.
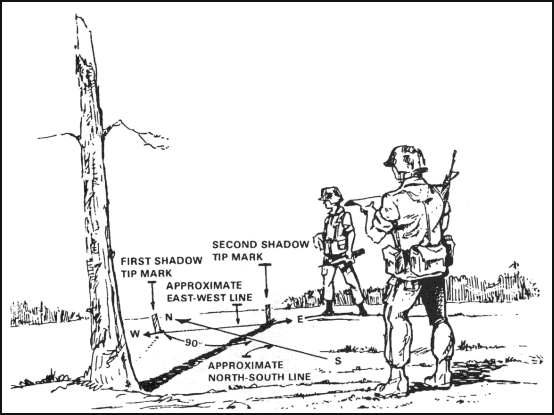
Figure 11-6. Field-expedient method.
11-2. LOCATIONS
The key to success in land navigation is to know your location at all times. With this basic knowledge, you can decide what direction and what distance to travel.
a. Known Position. Most important of all is the initial location of the user before starting any movement in the field. If movement takes place without establishing the initial location, everything that is done in the field from there on is a gamble. Determine the initial location by referring to the last known position, by grid coordinates and terrain association, or by locating and orienting your position on the map and ground.
b. Known Point/Known Distance (Polar Plot). This location can be determined by knowing the starting point, the azimuth to the desired objective, and the distance to it.
c. Resection. See Chapter 6.
d. Modified Resection. See Chapter 6.
e. Intersection. See Chapter 6.
f. Indirect Fire. Finding a location by indirect fire is done with smoke. Use the point of impact of the round as a reference point from which distances and azimuth can be obtained.
11-3. TERRAIN ASSOCIATION USAGE
The technique of moving by terrain association is more forgiving of mistakes and far less time-consuming than dead reckoning. It best suits those situations that call for movement from one area to another. Errors made using terrain association are easily corrected because you are comparing what you expected to see from the map to what you do see on the ground. Errors are anticipated and will not go unchecked. You can easily make adjustments based upon what you encounter. Periodic position-fixing through either plotted or estimated resection will also make it possible to correct your movements, call for fire, or call in the locations of enemy targets or any other information of tactical or logistical importance.
a. Matching the Terrain to the Map by Examining Terrain Features. By observing the contour lines in detail, the five major terrain features (hilltop, valley, ridge, depression, and saddle) should be determined. This is a simple task in an area where the observer has ample view of the terrain in all directions. One-by-one, match the terrain features depicted on the map with the same features on the ground. In restricted terrain, this procedure becomes harder; however, constantly check the map as you move since it is the determining factor (Figure 11-5).
b. Comparing the Vegetation Depicted on the Map. When comparing the vegetation, a topographic map should be used to make a comparison of the clearings that appear on the map with the ones on the ground. The user must be familiar with the different symbols, such as vineyards, plantations, and orchards that appear on the legend. The age of the map is an important factor when comparing vegetation. Some important vegetation features were likely to be different when the map was made. Another important factor about vegetation is that it can change overnight by natural accidents or by man (forest fires, clearing of land for new developments, farming, and so forth).
c. Masking by the Vegetation. Camouflage the important landforms using vegetation. Use of camouflage makes it harder for the navigator to use terrain association.
d. Using the Hydrography. Inland bodies of water can help during terrain association. The shape and size of lakes in conjunction with the size and direction of flow of the rivers and streams are valuable help.
e. Using Man-made Features. Man-made features are an important factor during terrain association. The user must be familiar with the symbols shown in the legend representing those features. The direction of buildings, roads, bridges, high-tension lines, and so forth make the terrain inspection a lot easier; however, the age of the map must be considered because man-made features appear and disappear constantly.
f. Examining the Same Piece of Terrain During the Different Seasons of the Year. In those areas of the world where the seasons are distinctive, a detailed examination of the terrain should be made during each of the seasons. The same piece of land does not present the same characteristics during both spring and winter.
(1) During winter, the snow packs the vegetation, delineating the land, making the terrain features appear as clear as they are shown by the contour lines on the map. Ridges, valleys, and saddles are very distinctive.
(2) During spring, the vegetation begins to reappear and grow. New vegetation causes a gradual change of the land to the point that the foliage conceals the terrain features and makes the terrain hard to recognize.
(3) During summer months, the effects are similar to those in the spring.
(4) Fall makes the land appear different with its change of color and gradual loss of vegetation.
(5) During the rainy season, the vegetation is green and thick, and the streams and ponds look like small rivers and lakes. In scarcely vegetated areas, the erosion changes the shape of the land.
(6) During a period of drought, the vegetation dries out and becomes vulnerable to forest fires that change the terrain whenever they occur. Also during this season, the water levels of streams and lakes drop, adding new dimensions and shape to the existing mapped areas.
g. Following an Example of Terrain Association. Your location is hilltop 514 in the lower center of the map in Figure 11-7.
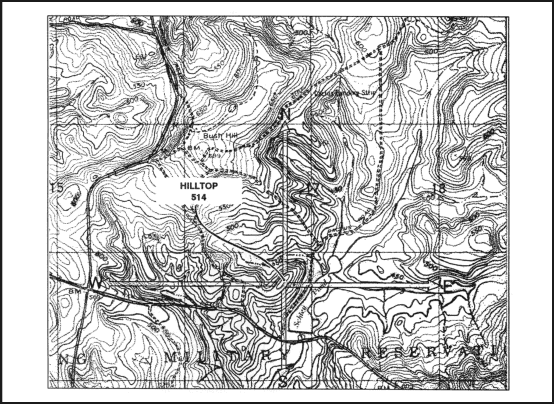
Figure 11-7. Example of terrain association.
(1) To The North. The contour lines indicate that the hill slopes down for about 190 meters, and that it leads into a small valley containing an intermittent stream. On the other side of the stream as you continue with your northerly inspection, the terrain starts a gradual ascent, indicating a hilltop partially covered with vegetation, until an unimproved road is reached. This road runs along a gradual ridgeline with north-west direction. Then the contour line spacings become narrow, indicating a steeper grade that leads to a narrow valley containing a small intermittent stream. As you continue up, you find a small but prominent ridge with a clearing. The contour lines once again show a steeper grade leading to a moderate valley containing an intermittent stream running in a south-east direction.
(2) To The East. There is a clearing of the terrain as it slopes down to Schley Pond. An ample valley is clearly seen on the right side of the pond, as indicated by the “U” and “V” shape of the contour lines. This valley contains some swamp areas and there is a long ridgeline on the north portion of the valley.
(3) To The South. The terrain gently slopes downward until a clear area is reached. It continues in a downward direction to an intermittent stream running south-east in a small valley. There is also an improved road running in the same direction as the valley. At the intersection of the roads as you face south, there is a clearing of about 120 meters on the ridge. At the bottom of it, a stream runs from Schley Pond in a south-west direction through an ample valley fed by two intermittent streams. As you continue, a steep, vegetated hill is found with a clearing on its top, followed by a small saddle and another hilltop.
(4) To The West. First, you see a small, clear valley. It is followed by a general ridgeline running north-west in which an unimproved road is located just before a hilltop. Continuing on a westerly direction, you will find a series of alternate valleys and ridges.
11-4. TACTICAL CONSIDERATIONS
Military cross-country navigation is intellectually demanding because it is imperative that the unit, crew, or vehicle survive and successfully complete the move in order to accomplish its mission. However, the unnecessary use of a difficult route makes navigation too complicated, creates more noise when proceeding over it, causes wear and tear on equipment and personnel, increases the need for and needlessly complicate recovery operations, and wastes scarce time. On receipt of a tactical mission, the leader begins his troop-leading procedures and makes a tentative plan. He bases the tentative plan on a good terrain analysis. He analyzes the considerations covered in the following mnemonics—OCOKA and METT-T.
a. OCOKA. The terrain should be analyzed for observation and fields of fire, cover and concealment, obstacles, key terrain, and avenues of approach.
(1) Observation and Fields of Fire. The purpose of observation is to see the enemy (or various landmarks) but not be seen by him. Anything that can be seen can be hit. Therefore, a field of fire is an area that a weapon or a group of weapons can cover effectively with fire from a given position.
(2) Cover and Concealment. Cover is shelter or protection (from enemy fire) either natural or artificial. Always try to use covered routes and seek cover for each halt, no matter how brief it is planned to be. Unfortunately, two factors interfere with obtaining constant cover. One is time and the other is terrain. Concealment is protection from observation or surveillance, including concealment from enemy air observation. Before, trees provided good concealment, but with modern thermal and infrared imaging equipment, trees are not always effective. When you are moving, concealment is generally secondary; therefore, select routes and positions that do not allow covered or concealed enemy near you.
(3) Obstacles. Obstacles are any obstructions that stop, delay, or divert movement. Obstacles can be natural (rivers, swamps, cliffs, or mountains) or they may be artificial (barbed wire entanglements, pits, concrete or metal antimechanized traps). They can be ready-made or constructed in the field. Always consider any possible obstacles along your movement route and, if possible, try to keep obstacles between the enemy and yourself.
(4) Key Terrain. Key terrain is any locality or area that the seizure or retention of affords a marked advantage to either combatant. Urban areas that are often seen by higher headquarters as being key terrain because they are used to control routes. On the other hand, an urban area that is destroyed may be an obstacle instead. High ground can be key because it dominates an area with good observation and fields of fire. In an open area, a draw or wadi (dry streambed located in an arid area) may provide the only cover for many kilometers, thereby becoming key. You should always attempt to locate any area near you that could be even remotely considered as key terrain.
(5) Avenues of Approach. These are access routes. They may be the routes you can use to get to the enemy or the routes they can use to get to you. Basically, an identifiable route that approaches a position or location is an avenue of approach to that location. They are often terrain corridors such as valleys or wide, open areas.
b . METT-T. Tactical factors other than the military aspects of terrain must also be considered in conjunction with terrain during movement planning and execution as well. These additional considerations are mission, enemy, terrain and weather, troops, and time available.
(1) Mission. This refers to the specific task assigned to a unit or individual. It is the duty or task together with the purpose that clearly indicates the action to be taken and the reason for it—but not how to do it. Training exercises should stress the importance of a thorough map reconnaissance to evaluate the terrain. This allows the leader to confirm his tentative plan, basing his decision on the terrain’s effect on his mission.
(a) Marches by foot or vehicle are used to move troops from one location to another. Soldiers must get to the right place, at the right time, and in good fighting condition. The normal rate for an 8-hour foot march is 4 kmph. However, the rate of march may vary, depending on the following factors:
-
Distance.
-
Time allowed.
-
Likelihood of enemy contact.
-
Terrain.
-
Weather.
-
Physical condition of soldiers.
-
Equipment/weight to be carried.
-
A motor march requires little or no walking by the soldiers, but the factors affecting the rate of march still apply.
(b) Patrol missions are used to conduct combat or reconnaissance operations. Without detailed planning and a thorough map reconnaissance, any patrol mission may not succeed. During the map reconnaissance, the mission leader determines a primary and alternate route to and from the objectives.
(c) Movement to contact is conducted whenever an element is moving toward the enemy but is not in contact with the enemy. The lead element must orient its movement on the objective by conducting a map reconnaissance, determining the location of the objective on both the map and the ground, and selecting the route to be taken.
(d) Delays and withdrawals are conducted to slow the enemy down without becoming decisively engaged, or to assume another mission. To be effective, the element leader must know where he is to move and the route to be taken.
(2) Enemy. This refers to the strength, status of training, disposition (locations), doctrine, capabilities, equipment (including night vision devices), and probable courses of action that impact upon both the planning and execution of the mission, including a movement.
(3) Terrain and Weather. Observation and fields of fire influence the placement of positions and crew-served weapons. The leader conducts a map reconnaissance to determine key terrain, obstacles, cover and concealment, and likely avenues of approach.
(a) Key terrain is any area whose control affords a marked advantage to the force holding it. Some types of key terrain are high ground, bridges, towns, and road junctions.
(b) Obstacles are natural or man-made terrain features that stop, slow down, or divert movement. Consideration of obstacles is influenced by the unit’s mission. An obstacle may be an advantage or disadvantage, depending upon the direction of attack or defense. Obstacles can be found by conducting a thorough map reconnaissance and study of recent aerial photographs.
(c) Cover and concealment are determined for both friendly and enemy forces. Concealment is protection from observation; cover is protection from the effects of fire. Most terrain features that offer cover also provide concealment from ground observation. There are areas that provide no concealment from enemy observation. These danger areas may be large or small open fields, roads, or streams. During the leader’s map reconnaissance, he determines any obvious danger areas and, if possible, adjusts his route.
(d) Avenues of approach are routes by which a unit may reach an objective or key terrain. To be considered an AA, a route must provide enough width for the deployment of the size force for which it is being considered. The AAs are also considered for the subordinate enemy force. For example, a company determines likely AAs for an enemy platoon; a platoon determines likely AAs for an enemy squad. Likely AAs may be either ridges, valleys, or by air. By examining the terrain, the leader determines the likely enemy AAs based on the tactical situation.
(e) Weather has little effect on dismounted land navigation. Rain and snow could possibly slow down the rate of march, that is all. But during mounted land navigation, the navigator must know the effect of weather on his vehicle. (See Chapter 12 for mounted land navigation.)
(4) Troops. Consideration of your own troops is equally important. The size and type of the unit to be moved and its capabilities, physical condition, status of training, and types of equipment assigned all affect the selection of routes, positions, fire plans, and the various decisions to be made during movement. On ideal terrain such as relatively level ground with little or no woods, a platoon can defend a front of up to 400 meters. The leader must conduct a thorough map reconnaissance and terrain analysis of the area his unit is to defend. Heavily wooded areas or very hilly areas may reduce the front a platoon can defend. The size of the unit must also be taken into consideration when planning a movement to contact. During movement, the unit must retain its ability to maneuver. A small draw or stream may reduce the unit’s maneuverability but provide excellent concealment. All of these factors must be considered.
(a) Types of equipment that may be needed by the unit can be determined by a map reconnaissance. For example, if the unit must cross a large stream during its movement to the objective, ropes may be needed for safety lines.
(b) Physical capabilities of the soldiers must be considered when selecting a route. Crossing a large swampy area may present no problem to a physically fit unit, but to a unit that has not been physically conditioned, the swampy area may slow or completely stop its movement.
(5) Time Available. At times, the unit may have little time to reach an objective or to move from one point to another. The leader must conduct a map reconnaissance to determine the quickest route to the objective; this is not always a straight route. From point A to point B on the map may appear to be 1,000 meters, but if the route is across a large ridge, the distance will be greater. Another route from point A to B may be 1,500 meters—but on flat terrain. In this case, the quickest route would be across the flat terrain; however, concealment and cover may be lost.
11-5. MOVEMENT AND ROUTE SELECTION
One key to success in tactical missions is the ability to move undetected to the objective. There are four steps to land navigation. Being given an objective and the requirement to move there, you must know where you are, plan the route, stay on the route, and recognize the objective.
a. Know Where You Are (Step 1). You must know where you are on the map and on the ground at all times and in every possible way. This includes knowing where you are relative to—
-
Your directional orientation.
-
The direction and distances to your objective.
-
Other landmarks and features.
-
Any impassable terrain, the enemy, and danger areas.
-
Both the advantages and disadvantages presented by the terrain between you and your objective.
This step is accomplished by knowing how to read a map, recognize and identify specific terrain and other features; determine and estimate direction; pace, measure, and estimate distances, and both plot and estimate a position by resection.
b. Plan the Route (Step 2). Depending upon the size of the unit and the length and type of movement to be conducted, several factors should be considered in selecting a good route or routes to be followed. These include—
-
Travel time.
-
Travel distance.
-
Maneuver room needed.
-
Trafficability.
-
Load-bearing capacities of the soil.
-
Energy expenditure by troops.
-
The factors of METT-T.
-
Tactical aspects of terrain (OCOKA).
-
Ease of logistical support.
-
Potential for surprising the enemy.
-
Availability of control and coordination features.
-
Availability of good checkpoints and steering marks.
In other words, the route must be the result of careful map study and should address the requirements of the mission, tactical situation, and time available. It must also provide for ease of movement and navigation.
(1) Three route-selection criteria that are important for small-unit movements are cover, concealment, and the availability of reliable checkpoint features. The latter is weighted even more heavily when selecting the route for a night operation. The degree of visibility and ease of recognition (visual effect) are the key to the proper selection of these features.
(2) The best checkpoints are linear features that cross the route. Examples include perennial streams, hard-top roads, ridges, valleys, railroads, and power transmission lines. Next, it is best to select features that represent elevation changes of at least two contour intervals such as hills, depressions, spurs, and draws. Primary reliance upon cultural features and vegetation is cautioned against because they are most likely to have changed since the map was last revised.
(3) Checkpoints located at places where changes in direction are made mark your decision points. Be especially alert to see and recognize these features during movement. During preparation and planning, it is especially important to review the route and anticipate where mistakes are most likely to be made so they can be avoided.
(4) Following a valley floor or proceeding near (not on) the crest of a ridgeline generally offers easy movement, good navigation checkpoints, and sufficient cover and concealment. It is best to follow terrain features whenever you can—not to fight them.
(5) A lost or a late arriving unit, or a tired unit that is tasked with an unnecessarily difficult move, does not contribute to the accomplishment of a mission. On the other hand, the unit that moves too quickly and carelessly into a destructive ambush or leaves itself open to air strikes also have little effect. Careful planning and study are required each time a movement route is to be selected.
c. Stay on the Route (Step 3). In order to know that you are still on the correct route, you must be able to compare the evidence you encounter as you move according to the plan you developed on the map when you selected your route. This may include watching your compass reading (dead reckoning) or recognizing various checkpoints or landmarks from the map in their anticipated positions and sequences as you pass them (terrain association). A better way is to use a combination of both.
d. Recognize the Objective (Step 4). The destination is rarely a highly recognizable feature such as a dominant hilltop or road junction. Such locations as this are seldom missed by the most inexperienced navigators and are often dangerous places for soldiers to occupy. The relatively small, obscure places are most likely to be the destinations.
(1) Just how does a soldier travel over unfamiliar terrain for moderate to great distances and know when he reaches the destination? One minor error, when many are possible, can cause the target to be missed.
(2) The answer is simple. Select a checkpoint (reasonably close to the destination) that is not so difficult to find or recognize. Then plan a short, fine-tuned last leg from the new expanded objective to the final destination. For example, you may be able to plan and execute the move as a series of sequenced movements from one checkpoint or landmark to another using both the terrain and a compass to keep you on the correct course. Finally, after arriving at the last checkpoint, you might follow a specific compass azimuth and pace off the relatively short, known distance to the final, pinpoint destination. This procedure is called point navigation. A short movement out from a unit position to an observation post or to a coordination point may also be accomplished in the same manner.
11-6. NAVIGATION METHODS
Staying on the route is accomplished through the use of one or two navigation techniques—dead reckoning and terrain association. These methods are discussed in detail below.
a. Moving by Dead Reckoning. Dead reckoning consists of two fundamental steps. The first is the use of a protractor and graphic scales to determine the direction and distance from one point to another on a map. The second step is the use of a compass and some means of measuring distance to apply this information on the ground. In other words, it begins with the determination of a polar coordinate on a map and ends with the act of finding it on the ground.
(1) Dead reckoning along a given route is the application of the same process used by a mapmaker as he establishes a measured line of reference upon which to construct the framework of his map. Therefore, triangulation exercises (either resection or intersection) can be easily undertaken by the navigator at any time to either determine or confirm precise locations along or near his route. Between these position-fixes, establish your location by measuring or estimating the distance traveled along the azimuth being followed from the previous known point. You might use pacing, a vehicle odometer, or the application of elapsed time for this purpose, depending upon the situation.
(2) Most dead reckoned movements do not consist of single straight-line distances because you cannot ignore the tactical and navigational aspects of the terrain, enemy situation, natural and man-made obstacles, time, and safety factors. Another reason most dead reckoning movements are not single straight-line distances is because compasses and pace-counts are imprecise measures. Error from them compounds over distance; therefore, you could soon be far afield from your intended route even if you performed the procedures correctly. The only way to counteract this phenomenon is to reconfirm your location by terrain association or resection. Routes planned for dead reckoning generally consist of a series of straight-line distances between several checkpoints with perhaps some travel running on or parallel to roads or trails.
(3) There are two advantages to dead reckoning. First, dead reckoning is easy to teach and to learn. Second, it can be a highly accurate way of moving from one point to another if done carefully over short distances, even where few external cues are present to guide the movements.
(4) During daylight, across open country, along a specified magnetic azimuth, never walk with the compass in the open position and in front of you. Because the compass will not stay steady or level, it does not give an accurate reading when held or used this way. Begin at the start point and face with the compass in the proper direction, then sight in on a landmark that is located on the correct azimuth to be followed. Close the compass and proceed to that landmark. Repeat the process as many times as necessary to complete the straight-line segment of the route.
(5) The landmarks selected for this purpose are called steering marks, and their selection is crucial to success in dead reckoning. Steering marks should never be determined from a map study. They are selected as the march progresses and are commonly on or near the highest points that you can see along the azimuth line that you are following when they are selected. They may be uniquely shaped trees, rocks, hilltops, posts, towers, and buildings—anything that can be easily identified. If you do not see a good steering mark to the front, you might use a back azimuth to some feature behind you until a good steering mark appears out in front. Characteristics of a good steering mark are:
(a) It must have some characteristics about it, such as color, shade of color, size, or shape (preferably all four), that will assure you that it will continue to be recognized as you approach it.
(b) If several easily distinguished objects appear along your line of march, the best steering mark is the most distant object. This procedure enables you to travel farther with fewer references to the compass. If you have many options, select the highest object. A higher mark is not as easily lost to sight as is a lower mark that blends into the background as you approach it. A steering mark should be continuously visible as you move toward it.
(c) Steering marks selected at night must have even more unique shapes than those selected during daylight. As darkness approaches, colors disappear and objects appear as black or gray silhouettes. Instead of seeing shapes, you begin to see only the general outlines that may appear to change as you move and see the objects from slightly different angles.
(6) Dead reckoning without natural steering marks is used when the area through which you are traveling is devoid of features, or when visibility is poor. At night, it may be necessary to send a member of the unit out in front of your position to create your own steering mark in order to proceed. His position should be as far out as possible to reduce the number of chances for error as you move. Arm-and-hand signals or a radio may be used in placing him on the correct azimuth. After he has been properly located, move forward to his position and repeat the process until some steering marks can be identified or until you reach your objective.
(7) When handling obstacles/detours on the route, follow these guidelines:
(a) When an obstacle forces you to leave your original line of march and take up a parallel one, always return to the original line as soon as the terrain or situation permits.
(b) To turn clockwise (right) 90 degrees, you must add 90 degrees to your original azimuth. To turn counterclockwise (left) 90 degrees from your current direction, you must subtract 90 degrees from your present azimuth.
(c) When making a detour, be certain that only paces taken toward the final destination are counted as part of your forward progress. They should not be confused with the local pacing that takes place perpendicular to the route in order to avoid the problem area and in returning to the original line of march after the obstacle has been passed.
(8) Sometimes a steering mark on your azimuth of travel can be seen across a swamp or some other obstacle to which you can simply walk out around. Dead reckoning can then begin at that point. If there is no obvious steering mark to be seen across the obstacle, perhaps one can be located to the rear. Compute a back azimuth to this point and later sight back to it once the obstacle has been passed in order to get back on track.
(9) You can use the deliberate offset technique. Highly accurate distance estimates and precision compass work may not be required if the destination or an intermediate checkpoint is located on or near a large linear feature that runs nearly perpendicular to your direction of travel. Examples include roads or highways, railroads, power transmission lines, ridges, or streams. In these cases, you should apply a deliberate error (offset) of about 10 degrees to the azimuth you planned to follow and then move, using the lensatic compass as a guide, in that direction until you encounter the linear feature. You will know exactly which way to turn (left or right) to find your destination or checkpoint, depending upon which way you planned your deliberate offset.
(10) Because no one can move along a given azimuth with absolute precision, it is better to plan a few extra steps than to begin an aimless search for the objective once you reach the linear feature. If you introduce your own mistake, you will certainly know how to correct it. This method will also cope with minor compass errors and the slight variations that always occur in the earth’s magnetic field.
(11) There are disadvantages to dead reckoning. The farther you travel by dead reckoning without confirming your position in relation to the terrain and other features, the more errors you will accumulate in your movements. Therefore, you should confirm and correct your estimated position whenever you encounter a known feature on the ground that is also on the map. Periodically, you should accomplish a resection triangulation using two or more known points to pinpoint and correct your position on the map. Pace counts or any type of distance measurement should begin anew each time your position is confirmed on the map.
(a) It is dangerous to select a single steering mark, such as a distant mountaintop, and then move blindly toward it. What will you do if you must suddenly call for fire support or a medical evacuation? You must periodically use resection and terrain association techniques to pinpoint your location along the way.
(b) Steering marks can be farther apart in open country, thereby making navigation more accurate. In areas of dense vegetation, however, where there is little relief, during darkness, or in fog, your steering marks must be close together. This, of course, introduces more chance for error.
(c) Finally, dead reckoning is time-consuming and demands constant attention to the compass. Errors accumulate easily and quickly. Every fold in the ground and detours as small as a single tree or boulder also complicate the measurement of distance.
b. Moving by Terrain Association. The technique of moving by terrain association is more forgiving of mistakes and far less time-consuming than dead reckoning. It best suits those situations that call for movement from one area to another. Once an error has been made in dead reckoning, you are off the track. Errors made using terrain association are easily corrected, however, because you are comparing what you expected to see from the map to what you do see on the ground. Errors are anticipated and will not go unchecked. You can easily make adjustments based upon what you encounter. After all, you do not find the neighborhood grocery store by dead reckoning—you adjust your movements according to the familiar landmarks you encounter along the way (Figure 11-8). Periodic position-fixing through either plotted or estimated resection will also make it possible to correct your movements, call for fire, or call in the locations of enemy targets or any other information of tactical or logistical importance.
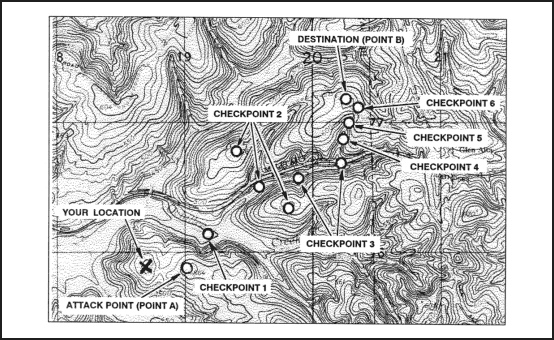
Figure 11-8. Terrain association navigation.
(1) Identifying and Locating Selected Features. Being able to identify and locate the selected features, both on the map and on the ground, are essential to the success in moving by terrain association. The following rules may prove helpful.
(a) Be certain the map is properly oriented when moving along the route and use the terrain and other features as guides. The orientation of the map must match the terrain or it can cause confusion.
(b) To locate and identify features being used to guide the movement, look for the steepness and shape of the slopes, the relative elevations of the various features, and the directional orientations in relation to your position and to the position of the other features you can see.
(c) Make use of the additional cues provided by hydrography, culture, and vegetation. All the information you can gather will assist you in making the move. The ultimate test and the best practice for this movement technique is to go out in the field and use it. The use of terrain, other natural features, and any man-made objects that appear both on the map and on the ground must be practiced at every opportunity. There is no other way to learn or retain this skill.
(2) Using Handrails, Catching Features, and Navigational Attack Points. First, because it is difficult to dead reckon without error over long distances with your compass, the alert navigator can often gain assistance from the terrain.
(a) Handrails are linear features like roads or highways, railroads, power transmission lines, ridgelines, or streams that run roughly parallel to your direction of travel. Instead of using precision compass work, you can rough compass without the use of steering marks for as long as the feature travels with you on your right or left. It acts as a handrail to guide the way.
(b) Second, when you reach the point where either your route or the handrail changes direction, you must be aware that it is time to go your separate ways. Some prominent feature located near this point is selected to provide this warning. This is called a catching feature; it can also be used to tell you when you have gone too far.
(c) Third, the catching feature may also be your navigational attack point; this point is the place where area navigation ends and point navigation begins. From this last easily identified checkpoint, the navigator moves cautiously and precisely along a given azimuth for a specified distance to locate the final objective. The selection of this navigational attack point is important. A distance of 500 meters or less is most desirable.
(3) Recognizing the Disadvantages of Terrain Association. The major disadvantage to navigation by terrain association is that you must be able to interpret the map and analyze the world around you. Recognition of terrain and other features, the ability to determine and estimate direction and distance, and knowing how to do quick-in-the-head position fixing are skills that are more difficult to teach, learn, and retain than those required for dead reckoning.
c. Combination of Techniques. Actually, the most successful navigation is obtained by combining the techniques described above. Constant orientation of the map and continuous observation of the terrain in conjunction with compass-read azimuths, and distance traveled on the ground compared with map distance, used together make reaching a destination more certain. One should not depend entirely on compass navigation or map navigation; either or both could be lost or destroyed.
NOTE:
Appendix F for information on orienteering.
11-7. NIGHT NAVIGATION
Darkness presents its own characteristics for land navigation because of limited or no visibility. However, the techniques and principles are the same as that used for day navigation. The success in nighttime land navigation depends on rehearsals during the planning phase before the movement, such as detailed analysis of the map to determine the type of terrain in which the navigation is going to take place and the predetermination of azimuths and distances. Night vision devices (Appendix H) can greatly enhance night navigation.
a. The basic technique used for nighttime land navigation is dead reckoning with several compasses recommended. The point man is in front of the navigator but just a few steps away for easy control of the azimuth. Smaller steps are taken during night navigation, so remember, the pace count is different. It is recommended that a pace count obtained by using a predetermined 100-meter pace course be used at night.
b. Navigation using the stars is recommended in some areas; however, a thorough knowledge of constellations and location of stars is needed (paragraph 9-5c). The four cardinal directions can also be obtained at night by using the same technique described for the shadow-tip method. Just use the moon instead of the sun. In this case, the moon has to be bright enough to cast a shadow.
Land Navigation Training Software
- Chapter 1: TRAINING STRATEGY
- Chapter 2: MAPS
- Chapter 3: MARGINAL INFORMATION AND SYMBOLS
- Chapter 4: GRIDS
- Chapter 5: SCALE AND DISTANCE
- Chapter 6: DIRECTION
- Chapter 7: OVERLAYS
- Chapter 8: AERIAL PHOTOGRAPHS
- Chapter 9: NAVIGATION EQUIPMENT AND METHODS
- Chapter 10: ELEVATION AND RELIEF
- Chapter 11: TERRAIN ASSOCIATION
- Chapter 12: MOUNTED LAND NAVIGATION
- Chapter 13: NAVIGATION IN DIFFERENT TYPES OF TERRAIN
- Chapter 14: UNIT SUSTAINMENT
- Appendix A: FIELD SKETCHING
- Appendix B: MAP FOLDING TECHNIQUES
- Appendix C: UNITS OF MEASURE AND CONVERSION FACTORS
- Appendix D: JOINT OPERATIONS GRAPHICS
- Appendix E: EXPORTABLE TRAINING MATERIAL
- Appendix F: ORIENTEERING
- Appendix G: M2 COMPASS
- Appendix H: ADDITIONAL AIDS
- Appendix I: FOREIGN MAPS
- Appendix J: GLOBAL POSITIONING SYSTEM
- Appendix K: PRECISION LIGHTWEIGHT GLOBAL POSITIONING SYSTEM RECEIVER
- Map Reading and Land Navigation GLOSSARY
- Map Reading and Land Navigation REFERENCES