Chapter 6
DIRECTION
Being in the right place at the prescribed time is necessary to successfully accomplish military missions. Direction plays an important role in a soldier’s everyday life. It can be expressed as right, left, straight ahead, and so forth; but then the question arises, “To the right of what?” This chapter defines the word azimuth and the three different norths. It explains in detail how to determine the grid and the magnetic azimuths with the use of the protractor and the compass. It explains the use of some field-expedient methods to find directions, the declination diagram, and the conversion of azimuths from grid to magnetic and vice versa. It also includes some advanced aspects of map reading, such as intersection, resection, modified resection, and polar plots.
6-1. METHODS OF EXPRESSING DIRECTION
Military personnel need a way of expressing direction that is accurate, is adaptable to any part of the world, and has a common unit of measure. Directions are expressed as units of angular measure.
a. Degree. The most common unit of measure is the degree (°) with its subdivisions of minutes (‘) and seconds (“).
1 degree = 60 minutes.
1 minute = 60 seconds.
b. Mil. Another unit of measure, the mil (abbreviated ), is used mainly in artillery, tank, and mortar gunnery. The mil expresses the size of an angle formed when a circle is divided into 6,400 angles, with the vertex of the angles at the center of the circle. A relationship can be established between degrees and mils. A circle equals 6400 mils divided by 360 degrees, or 17.78 mils per degree. To convert degrees to mils, multiply degrees by 17.78.
c. Grad. The grad is a metric unit of measure found on some foreign maps. There are 400 grads in a circle (a 90-degree right angle equals 100 grads). The grad is divided into 100 centesimal minutes (centigrads) and the minute into 100 centesimal seconds (milligrads).
6-2. BASE LINES
In order to measure something, there must always be a starting point or zero measurement. To express direction as a unit of angular measure, there must be a starting point or zero measure and a point of reference These two points designate the base or reference line. There are three base lines— true north, magnetic north, and grid north. The most commonly used are magnetic and grid.
a. True North. A line from any point on the earth’s surface to the north pole. All lines of longitude are true north lines. True north is usually represented by a star (Figure 6-1).
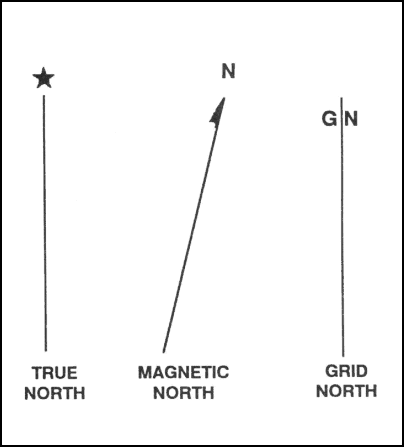
Figure 6-1. Three norths.
b. Magnetic North. The direction to the north magnetic pole, as indicated by the north-seeking needle of a magnetic instrument. The magnetic north is usually symbolized by a line ending with half of an arrowhead (Figure 6-1). Magnetic readings are obtained with magnetic instruments, such as lensatic and M2 compasses.
c. Grid North. The north that is established by using the vertical grid lines on the map. Grid north may be symbolized by the letters GN or the letter “y” (Figure 6-1).
6-3. AZIMUTHS
An azimuth is defined as a horizontal angle measured clockwise from a north base line. This north base line could be true north, magnetic north, or grid north. The azimuth is the most common military method to express direction. When using an azimuth, the point from which the azimuth originates is the center of an imaginary circle (Figure 6-2). This circle is divided into 360 degrees or 6400 mils (Appendix G).
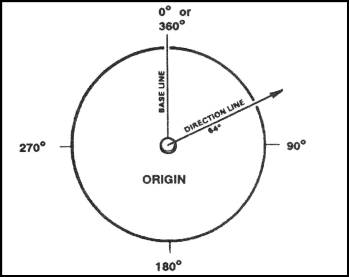
Figure 6-2. Origin of azimuth circle.
a. Back Azimuth. A back azimuth is the opposite direction of an azimuth. It is comparable to doing “about face.” To obtain a back azimuth from an azimuth, add 180 degrees if the azimuth is 180 degrees or less, or subtract 180 degrees if the azimuth is 180 degrees or more (Figure 6-3). The back azimuth of 180 degrees may be stated as 0 degrees or 360 degrees. For mils, if the azimuth is less than 3200 mils, add 3200 mils, if the azimuth is more than 3200 mils, subtract 3200 mils.
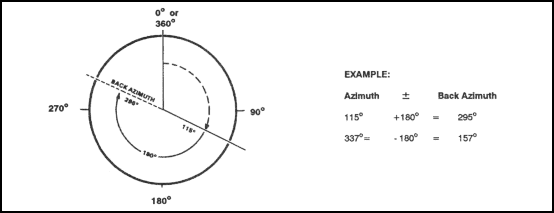
Figure 6-3. Back azimuth.
WARNING
When converting azimuths into back azimuths, extreme care should be exercised when adding or subtracting the 180 degrees. A simple mathematical mistake could cause disastrous consequences.
b. Magnetic Azimuth. The magnetic azimuth is determined by using magnetic instruments, such as lensatic and M2 compasses. Refer to Chapter 9, paragraph 4, for details.
c. Field-Expedient Methods. Several field-expedient methods to determine direction are discussed in Chapter 9, paragraph 5.
6-4. GRID AZIMUTHS
When an azimuth is plotted on a map between point A (starting point) and point B (ending point), the points are joined together by a straight line. A protractor is used to measure the angle between grid north and the drawn line, and this measured azimuth is the grid azimuth (Figure 6-4).

Figure 6-4. Measuring an azimuth.
WARNING
When measuring azimuths on a map, remember that you are measuring from a starting point to an ending point. If a mistake is made and the reading is taken from the ending point, the grid azimuth will be opposite, thus causing the user to go in the wrong direction.
6-5. PROTRACTOR
There are several types of protractors—full circle, half circle, square, and rectangular (Figure 6-5). All of them divide the circle into units of angular measure, and each has a scale around the outer edge and an index mark. The index mark is the center of the protractor circle from which all directions are measured.
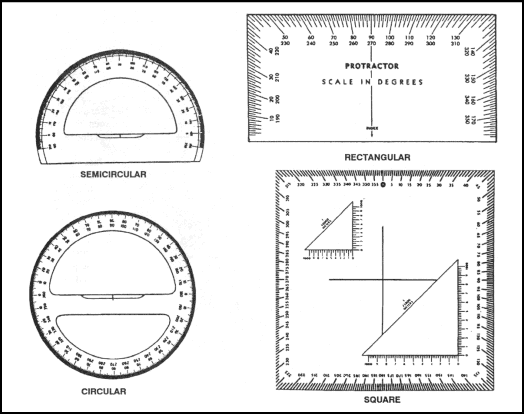
Figure 6-5. Types of protractors.
a. The military protractor, GTA 5-2-12, contains two scales: one in degrees (inner scale) and one in mils (outer scale). This protractor represents the azimuth circle. The degree scale is graduated from 0 to 360 degrees; each tick mark on the degree scale represents one degree. A line from 0 to 180 degrees is called the base line of the protractor. Where the base line intersects the horizontal line, between 90 and 270 degrees, is the index or center of the protractor (Figure 6-6).
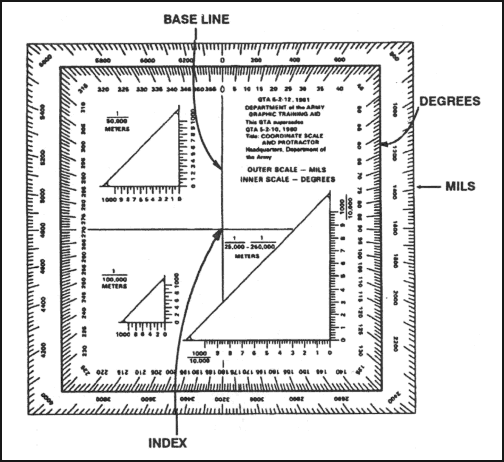
Figure 6-6. Military protractor.
b. When using the protractor, the base line is always oriented parallel to a north-south grid line. The 0- or 360-degree mark is always toward the top or north on the map and the 90° mark is to the right.
(1) To determine the grid azimuth—
(a) Draw a line connecting the two points (A and B).
(b) Place the index of the protractor at the point where the drawn line crosses a vertical (north-south) grid line.
(c) Keeping the index at this point, align the 0- to 180-degree line of the protractor on the vertical grid line.
(d) Read the value of the angle from the scale; this is the grid azimuth from point A to point B (Figure 6-4).
(2) To plot an azimuth from a known point on a map (Figure 6-7)—
(a) Convert the azimuth from magnetic to grid, if necessary. (See paragraph 6-6.)
(b) Place the protractor on the map with the index mark at the center of mass of the known point and the base line parallel to a north-south grid line.
(c) Make a mark on the map at the desired azimuth.
(d) Remove the protractor and draw a line connecting the known point and the mark on the map. This is the grid direction line (azimuth).
NOTE:
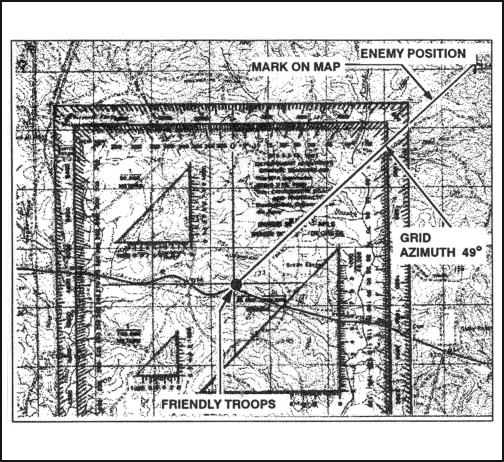
Figure 6-7. Plotting an azimuth on the map.
c. To obtain an accurate reading with the protractor (to the nearest degree or 10 mils), there are two techniques to check that the base line of the protractor is parallel to a north-south grid line.
(1) Place the protractor index where the azimuth line cuts a north-south grid line, aligning the base line of the protractor directly over the intersection of the azimuth line with the north-south grid line. The user should be able to determine whether the initial azimuth reading was correct.
(2) The user should re-read the azimuth between the azimuth and north-south grid line to check the initial azimuth.
(3) Note that the protractor is cut at both the top and bottom by the same north-south grid line. Count the number of degrees from the 0-degree mark at the top of the protractor to this north-south grid line and then count the number of degrees from the 180-degree mark at the bottom of the protractor to this same grid line. If the two counts are equal, the protractor is properly aligned.
6-6. DECLINATION DIAGRAM
Declination is the angular difference between any two norths. If you have a map and a compass, the one of most interest to you will be between magnetic and grid north. The declination diagram (Figure 6-8) shows the angular relationship, represented by prongs, among grid, magnetic, and true norths. While the relative positions of the prongs are correct, they are seldom plotted to scale. Do not use the diagram to measure a numerical value. This value will be written in the map margin (in both degrees and mils) beside the diagram.
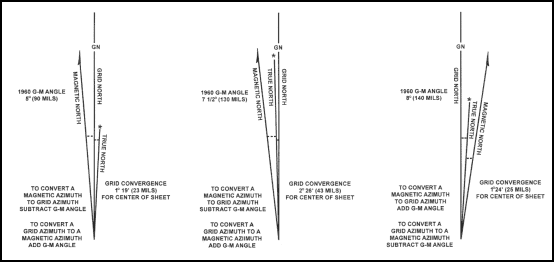
Figure 6-8. Declination diagrams.
a. Location. A declination diagram is a part of the information in the lower margin on most larger maps. On medium-scale maps, the declination information is shown by a note in the map margin.
b. Grid-Magnetic Angle. The G-M angle value is the angular size that exists between grid north and magnetic north. It is an arc, indicated by a dashed line, that connects the grid-north and magnetic-north prongs. This value is expressed to the nearest 1/2 degree, with mil equivalents shown to the nearest 10 mils. The G-M angle is important to the map reader/land navigator because azimuths translated between map and ground will be in error by the size of the declination angle if not adjusted for it.
c. Grid Convergence. An arc indicated by a dashed line connects the prongs for true north and grid north. The value of the angle for the center of the sheet is given to the nearest full minute with its equivalent to the nearest mil. These data are shown in the form of a grid-convergence note.
d. Conversion. There is an angular difference between the grid north and the magnetic north. Since the location of magnetic north does not correspond exactly with the grid-north lines on the maps, a conversion from magnetic to grid or vice versa is needed.
(1) With Notes. Simply refer to the conversion notes that appear in conjunction with the diagram explaining the use of the G-M angle (Figure 6-8). One note provides instructions for converting magnetic azimuth to grid azimuth; the other, for converting grid azimuth to magnetic azimuth. The conversion (add or subtract) is governed by the direction of the magnetic-north prong relative to that of the north-grid prong.
(2) Without Notes. In some cases, there are no declination conversion notes on the margin of the map; it is necessary to convert from one type of declination to another. A magnetic compass gives a magnetic azimuth; but in order to plot this line on a gridded map, the magnetic azimuth value must be changed to grid azimuth. The declination diagram is used for these conversions. A rule to remember when solving such problems is this: No matter where the azimuth line points, the angle to it is always measured clockwise from the reference direction (base line). With this in mind, the problem is solved by the following steps:
(a) Draw a vertical or grid-north line (prong). Always align this line with the vertical lines on a map (Figure 6-9).
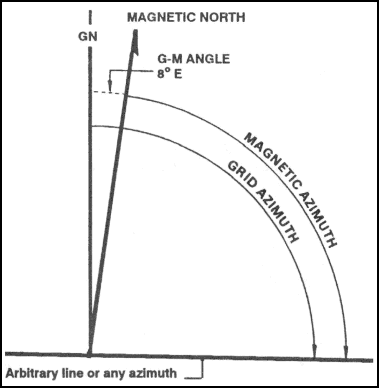
Figure 6-9. Declination diagram with arbitrary line.
(b) From the base of the grid-north line (prong), draw an arbitrary line (or any azimuth line) at a roughly right angle to north, regardless of the actual value of the azimuth in degrees (Figure 6-9).
(c) Examine the declination diagram on the map and determine the direction of the magnetic north (right-left or east-west) relative to that of the grid-north prong. Draw a magnetic prong from the apex of the grid-north line in the desired direction (Figure 6-9).
(d) Determine the value of the G-M angle. Draw an arc from the grid prong to the magnetic prong and place the value of the G-M angle (Figure 6-9).
(e) Complete the diagram by drawing an arc from each reference line to the arbitrary line. A glance at the completed diagram shows whether the given azimuth or the desired azimuth is greater, and thus whether the known difference between the two must be added or subtracted.
(f) The inclusion of the true-north prong in relationship to the conversion is of little importance.
e. Applications. Remember, there are no negative azimuths on the azimuth circle. Since 0 degree is the same as 360 degrees, then 2 degrees is the same as 362 degrees. This is because 2 degrees and 362 degrees are located at the same point on the azimuth circle. The grid azimuth can now be converted into a magnetic azimuth because the grid azimuth is now larger than the G-M angle.
(1) When working with a map having an east G-M angle:
(a) To plot a magnetic azimuth on a map, first change it to a grid azimuth (Figure 6-10).
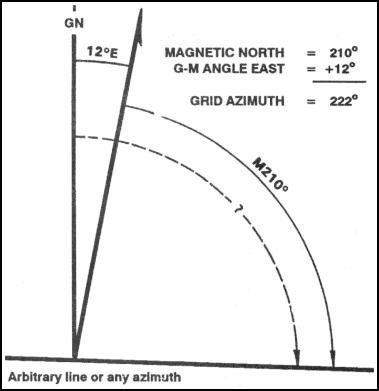
Figure 6-10. Converting to grid azimuth.
(b) To use a magnetic azimuth in the field with a compass, first change the grid azimuth plotted on a map to a magnetic azimuth (Figure 6-11).
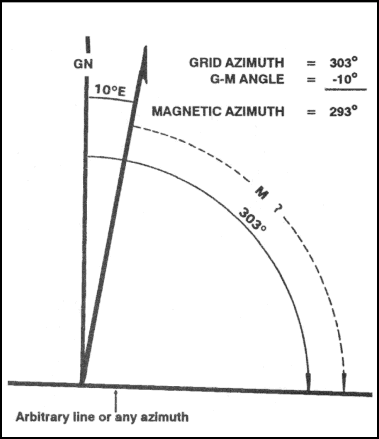
Figure 6-11. Converting to magnetic azimuth.
(c) Convert a grid azimuth to a magnetic azimuth when the G-M angle is greater than a grid azimuth (Figure 6-12).

Figure 6-12. Converting to a magnetic azimuth when the G-M angle is greater.
(2) When working with a map having a west G-M angle:
(a) To plot a magnetic azimuth on a map, first convert it to a grid azimuth (Figure 6-13).
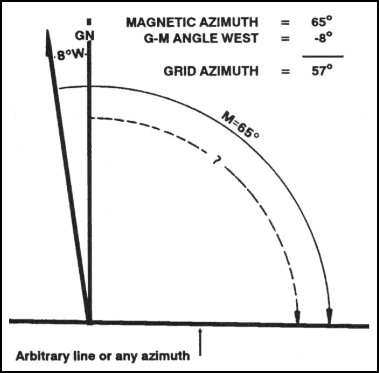
Figure 6-13. Converting to a grid azimuth on a map.
(b) To use a magnetic azimuth in the field with a compass, change the grid azimuth plotted on a map to a magnetic azimuth (Figure 6-14).
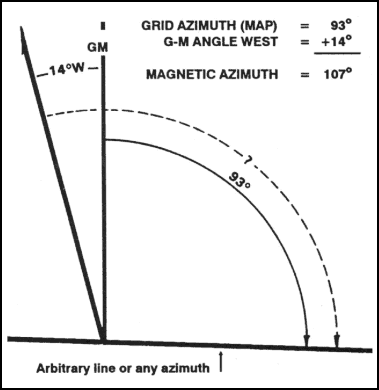
Figure 6-14. Converting to a magnetic azimuth on a map.
(c) Convert a magnetic azimuth when the G-M angle is greater than the magnetic azimuth (Figure 6-15).
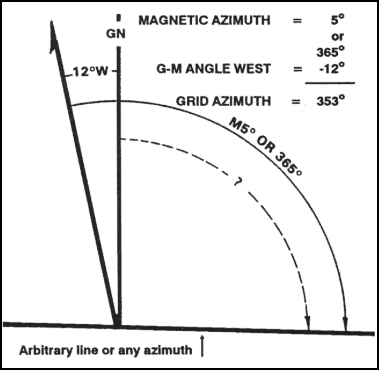
Figure 6-15. Converting to a grid azimuth when the G-M angle is greater.
(3) The G-M angle diagram should be constructed and used each time the conversion of azimuth is required. Such procedure is important when working with a map for the first time. It also may be convenient to construct a G-M angle conversion table on the margin of the map.
NOTE:
6-7. INTERSECTION
Intersection is the location of an unknown point by successively occupying at least two (preferably three) known positions on the ground and then map sighting on the unknown location. It is used to locate distant or inaccessible points or objects such as enemy targets and danger areas. There are two methods of intersection: the map and compass method and the straightedge method (Figures 6-16 and 6-17).
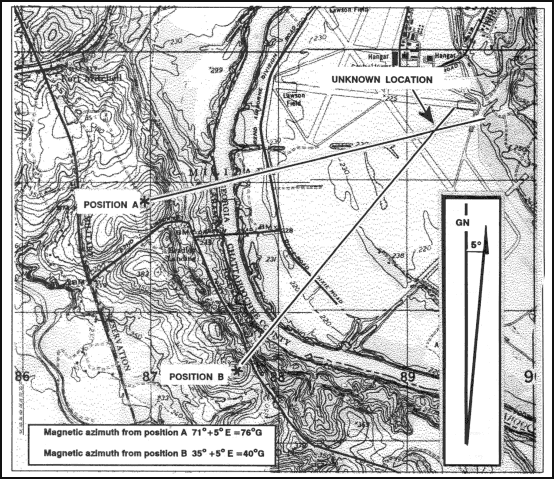
Figure 6-16. Intersection, using map and compass.
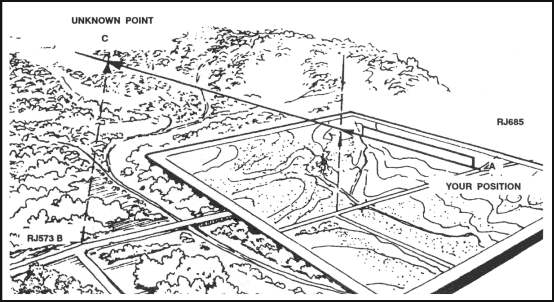
Figure 6-17. Intersection, using a straightedge.
a. When using the map and compass method—
(1) Orient the map using the compass.
(2) Locate and mark your position on the map,
(3) Determine the magnetic azimuth to the unknown position using the compass.
(4) Convert the magnetic azimuth to grid azimuth.
(5) Draw a line on the map from your position on this grid azimuth.
(6) Move to a second known point and repeat steps 1, 2, 3, 4, and 5.
(7) The location of the unknown position is where the lines cross on the map. Determine the grid coordinates to the desired accuracy.
b. The straight edge method is used when a compass is not available. When using it—
(1) Orient the map on a flat surface by the terrain association method.
(2) Locate and mark your position on the map.
(3) Lay a straight edge on the map with one end at the user’s position (A) as a pivot point; then, rotate the straightedge until the unkown point is sighted along the edge.
(4) Draw a line along the straight edge
(5) Repeat the above steps at position (B) and check for accuracy.
(6) The intersection of the lines on the map is the location of the unknown point (C). Determine the grid coordinates to the desired accuracy (Figure 6-17).
6-8. RESECTION
Resection is the method of locating one’s position on a map by determining the grid azimuth to at least two well-defined locations that can be pinpointed on the map. For greater accuracy, the desired method of resection would be to use three or more well-defined locations.
a. When using the map and compass method (Figure 6-18)—
(1) Orient the map using the compass.
(2) Identify two or three known distant locations on the ground and mark them on the map.
(3) Measure the magnetic azimuth to one of the known positions from your location using a compass.
(4) Convert the magnetic azimuth to a grid azimuth.
(5) Convert the grid azimuth to a back azimuth. Using a protractor, draw a line for the back azimuth on the map from the known position back toward your unknown position.
(6) Repeat 3, 4, and 5 for a second position and a third position, if desired.
(7) The intersection of the lines is your location. Determine the grid coordinates to the desired accuracy.
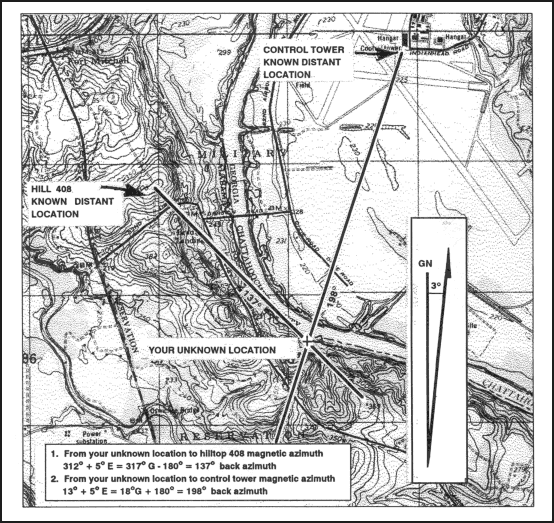
Figure 6-18. Resection with map and compass.
a. When using the straightedge method (Figure 6-19)—
(1) Orient the map on a flat surface by the terrain association method.
(2) Locate at least two known distant locations or prominent features on the ground and mark them on the map.
(3) Lay a straightedge on the map using a known position as a pivot point. Rotate the straightedge until the known position on the map is aligned with the known position on the ground.
(4) Draw a line along the straightedge away from the known position on the ground toward your position.
(5) Repeat 3 and 4 using a second known position.
(6) The intersection of the lines on the map is your location. Determine the grid coordinates to the desired accuracy.
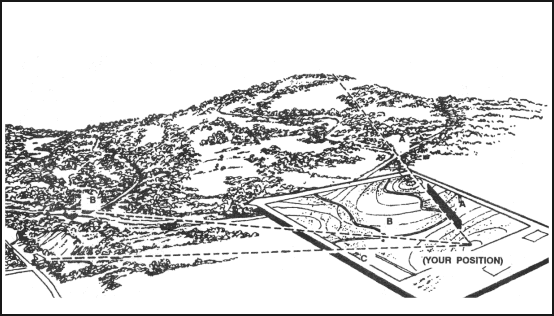
Figure 6-19. Resection with straightedge.
6-9. MODIFIED RESECTION
Modified resection is the method of locating one’s position on the map when the person is located on a linear feature on the ground, such as a road, canal, or stream (Figure 6-20). Proceed as follows:
a. Orient the map using a compass or by terrain association.
b. Find a distant point that can be identified on the ground and on the map.
c. Determine the magnetic azimuth from your location to the distant known point.
d. Convert the magnetic azimuth to a grid azimuth.
e. Convert the grid azimuth to a back azimuth. Using a protractor, draw a line for the back azimuth on the map from the known position back toward your unknown position.
f. The location of the user is where the line crosses the linear feature. Determine the grid coordinates to the desired accuracy.
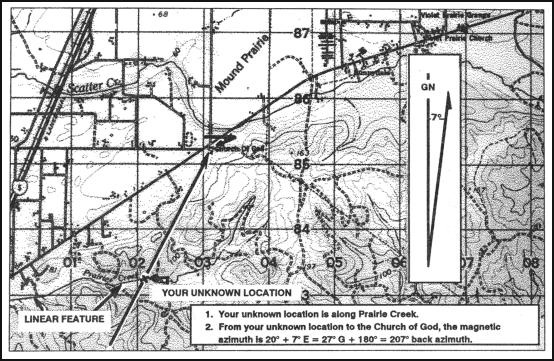
Figure 6-20. Modified resection.
6-10. POLAR COORDINATES
A method of locating or plotting an unknown position from a known point by giving a direction and a distance along that direction line is called polar coordinates. The following elements must be present when using polar coordinates (Figure 6-21).
-
Present known location on the map.
-
Azimuth (grid or magnetic).
-
Distance (in meters).
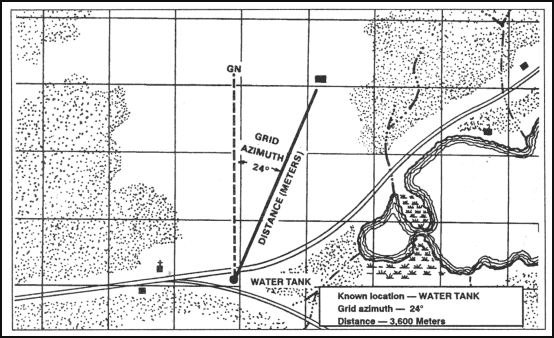
Figure 6-21. Polar plot.
Using the laser range finder to determine the range enhances your accuracy in determining the unknown position’s location.
Land Navigation Training Software
- Chapter 1: TRAINING STRATEGY
- Chapter 2: MAPS
- Chapter 3: MARGINAL INFORMATION AND SYMBOLS
- Chapter 4: GRIDS
- Chapter 5: SCALE AND DISTANCE
- Chapter 6: DIRECTION
- Chapter 7: OVERLAYS
- Chapter 8: AERIAL PHOTOGRAPHS
- Chapter 9: NAVIGATION EQUIPMENT AND METHODS
- Chapter 10: ELEVATION AND RELIEF
- Chapter 11: TERRAIN ASSOCIATION
- Chapter 12: MOUNTED LAND NAVIGATION
- Chapter 13: NAVIGATION IN DIFFERENT TYPES OF TERRAIN
- Chapter 14: UNIT SUSTAINMENT
- Appendix A: FIELD SKETCHING
- Appendix B: MAP FOLDING TECHNIQUES
- Appendix C: UNITS OF MEASURE AND CONVERSION FACTORS
- Appendix D: JOINT OPERATIONS GRAPHICS
- Appendix E: EXPORTABLE TRAINING MATERIAL
- Appendix F: ORIENTEERING
- Appendix G: M2 COMPASS
- Appendix H: ADDITIONAL AIDS
- Appendix I: FOREIGN MAPS
- Appendix J: GLOBAL POSITIONING SYSTEM
- Appendix K: PRECISION LIGHTWEIGHT GLOBAL POSITIONING SYSTEM RECEIVER
- Map Reading and Land Navigation GLOSSARY
- Map Reading and Land Navigation REFERENCES